Greek Pita vs. Middle Eastern: Why Pocketless is Best for Gyros
There's a universally acknowledged truth among food lovers: nothing quite compares to the sublime experience of biting into a perfectly crafted gyro. The succulent, seasoned meat, the tangy tzatziki, crisp vegetables, and perhaps even a few fries, all cradled within a soft, warm flatbread. But not just any flatbread will do. While many associate the term "pita" with a bread designed to form a convenient pocket for stuffing, the true magic of an authentic Greek gyro lies in its unique, pocketless counterpart. If you've ever wondered how to make Greek pita gyro bread that truly elevates your homemade creations, you're about to discover the delicious difference.
The Tale of Two Pitas: Greek vs. Middle Eastern
Before we delve into the culinary superiority of the Greek version, it's essential to understand that "pita" isn't a monolithic term. There are distinct regional variations, each with its own character and purpose. The most common distinction is between Middle Eastern pita and Greek pita.
- Middle Eastern Pita: The Pocket Dweller
This is the pita many people are most familiar with. Characterized by its thin, often slightly drier texture and, crucially, a distinctive pocket that forms during baking, it's designed for stuffing. Think falafel, hummus, or various salads tucked neatly inside. The pocket is created by steam puffing up the dough, separating the two layers as it bakes. While excellent for holding loose ingredients, this structural characteristic often means it can tear easily under pressure or when overloaded, making it less ideal for a robust, saucy gyro.
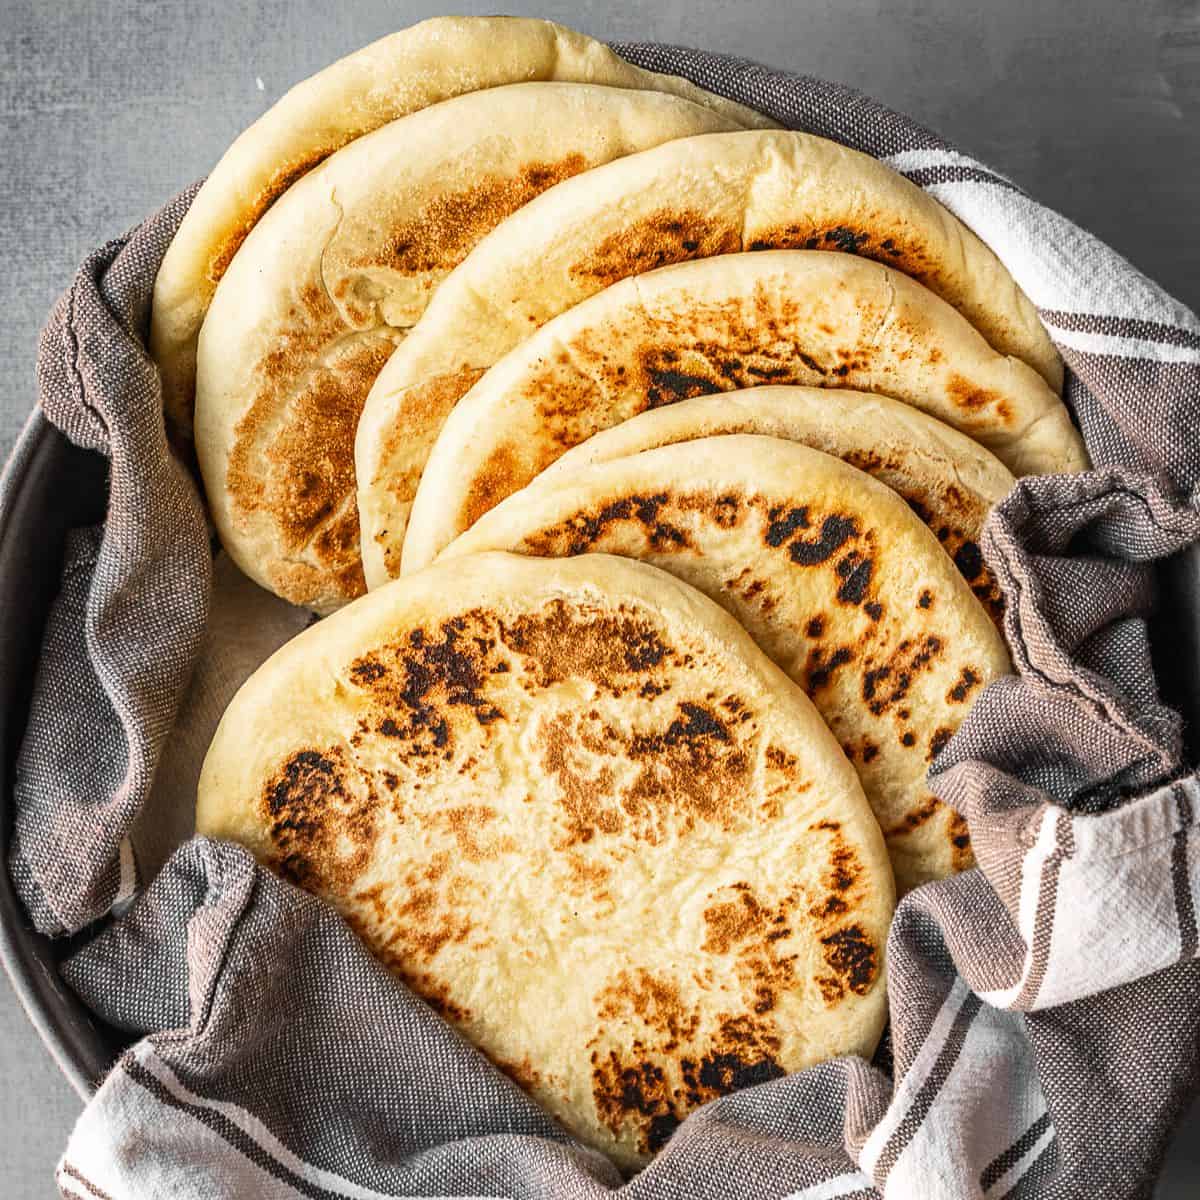
- Greek Pita (Gyro Bread): The Pocketless Embrace
In contrast, Greek pita, often simply referred to as gyro bread, is fundamentally different. It's a thicker, softer, and notably pocketless flatbread. Instead of puffing up into two distinct layers, it bakes as a single, cohesive, fluffy piece. Its texture is closer to a tender naan or a substantial tortilla than its Middle Eastern cousin. This unique structure and dough consistency make it the undisputed champion for wrapping around the generous fillings of a gyro.
Why Pocketless Reigns Supreme for Gyros
The absence of a pocket isn't just a quirk; it's a deliberate design choice that makes Greek pita the perfect vehicle for a gyro. Here’s why this pocketless wonder is simply the best:
- Unrivaled Structural Integrity: A gyro is a masterpiece of layers – thinly sliced meat, creamy tzatziki, ripe tomatoes, crisp onions, and often hot fries. A traditional Middle Eastern pita, with its inherent pocket, is prone to tearing and leaking under the weight and moisture of these ingredients. The Greek pita, being a solid, single piece of dough, forms a robust and resilient wrap that can hold everything together without falling apart, ensuring every bite is a complete experience.
- Superior Texture and Absorbency: The soft, slightly chewy texture of Greek pita perfectly complements the richness of the gyro meat. Its surface is designed to absorb the delicious juices and sauces, especially the fragrant olive oil and tangy tzatziki, allowing the bread to become an integral part of the flavor profile rather than just a container. This absorption ensures a more harmonious blend of flavors in every mouthwatering bite.
- Comfort in Every Bite: Eating a gyro should be a joyful, not messy, experience. The pocketless design means there's no risk of fillings escaping through an unforeseen tear or a structural weakness in the bread's internal layers. It's engineered for a clean, enjoyable, and authentic Greek street food experience.
- The Authentic Touch: In Greece, a gyro is served one way: lovingly wrapped in a warm, fluffy, pocketless pita. This isn't just a preference; it's a culinary tradition that has evolved to perfection over generations. When you make Greek pita at home, you're not just baking bread; you're recreating an authentic taste of Greece.
Mastering Homemade Greek Pita (Gyro Bread): The Essentials
Now that you understand why pocketless is best, let's explore how to make Greek pita gyro bread at home. It's surprisingly simple, requiring just a few staple ingredients and a straightforward process. The reward is irresistibly soft, flavorful pitas that will transform your homemade gyros.
Key Ingredients for the Perfect Pita:
While variations exist, the core ingredients remain consistent for an outstanding Greek pita:
- Bread Flour: This is your secret weapon. High-gluten white bread flour provides the necessary structure and elasticity, resulting in a wonderfully chewy and well-risen pita. The higher protein content develops gluten more effectively, giving that signature chewiness.
- Yeast: Active dry or instant yeast is crucial for leavening. It gives the pita its light, airy texture. Remember to activate it properly with lukewarm water.
- Warm Water: Essential for activating the yeast. The ideal temperature is between 99-104ºF (37-40ºC) – too cold, and the yeast won't activate; too hot, and you'll kill it.
- Olive Oil: A staple in Greek cuisine, olive oil adds richness, tenderness, and moisture to the dough, preventing it from drying out. Use a good quality extra virgin olive oil for the best flavor.
- Salt: Beyond flavor enhancement, salt plays a vital role in regulating yeast activity and strengthening the gluten structure.
- Greek Yogurt (Optional but Recommended): For an extra level of softness, fluffiness, and a subtle tang, some recipes incorporate Greek yogurt. It adds moisture and contributes to a beautifully tender crumb. Make sure it's at room temperature for smooth incorporation. This is one of the secret ingredients for easy Greek pita that truly elevates the texture!
- Sugar (Optional): A small pinch of sugar helps to 'feed' the yeast, encouraging it to activate more vigorously and contributing to a better rise and a slight browning.
Simplified Steps to Deliciousness:
- Activate the Yeast: In a small bowl, combine lukewarm water with yeast (and sugar, if using). Let it sit for 5-10 minutes until foamy. This confirms your yeast is active.
- Combine Dry Ingredients: In a large bowl, whisk together the bread flour and salt.
- Form the Dough: Pour the activated yeast mixture and olive oil (and room temperature Greek yogurt, if using) into the dry ingredients. Mix with a spoon or your hands until a shaggy, rough dough forms.
- Knead: Turn the dough out onto a lightly floured surface and knead for 5-7 minutes. This develops the gluten, resulting in a smooth, elastic dough.
- First Rise: Place the dough in a lightly oiled bowl, cover with plastic wrap or a damp kitchen towel, and let it rise in a warm place for 60-90 minutes, or until doubled in size.
- Divide and Shape: Gently deflate the risen dough, then divide it into 6-8 equal pieces. Roll each piece into a smooth ball, then flatten it into a disc about 6-8 inches in diameter and about ¼-inch thick.
- Second Rise (Optional but Recommended): Cover the shaped pitas and let them rest for another 15-20 minutes. This allows them to puff up slightly for a softer texture.
- Cook: Heat a cast-iron skillet or non-stick pan over medium-high heat. Cook each pita for 2-3 minutes per side, until golden brown spots appear and the bread is cooked through. You'll see some beautiful bubbles form on the surface. For a truly easy homemade Greek pita: fluffy gyro bread for perfect wraps, a hot pan is key!
Pro Tips for Success:
- Don't Overwork: While kneading is important, overworking the dough can make it tough. Look for a smooth, elastic consistency.
- Hot Pan, Fast Cook: A very hot pan cooks the pita quickly, preventing it from drying out and encouraging those delightful bubbles.
- Keep Warm: As you cook them, stack the finished pitas and cover them with a clean kitchen towel to keep them warm and soft until serving.
- Storage: Leftover pitas can be stored in an airtight container at room temperature for a day or two, or frozen for up to three months. Reheat gently in a pan or microwave.
Beyond the Gyro: Versatile Uses for Your Homemade Pita
While perfect for gyros, your homemade Greek pita bread is incredibly versatile. Don't limit its use to just wraps!
- Dipping Delight: It's the ideal companion for creamy tzatziki, rich hummus, smoky melitzanosalata (eggplant dip), or any of your favorite spreads.
- Souvlaki Wrapper: Just like gyros, Greek pita is the traditional choice for wrapping skewers of grilled chicken, pork, or lamb souvlaki.
- Mini Pizza Base: Top with tomato sauce, cheese, and your favorite toppings for a quick and delicious individual pizza.
- Accompaniment: Serve alongside grilled meats, salads, or stews to mop up every last bit of delicious sauce.
- Vegetarian Wraps: Use it to create flavorful wraps with roasted vegetables, halloumi cheese, or even a homemade eggplant gyro as mentioned in some traditional recipes.
Conclusion
The distinction between Greek and Middle Eastern pita is more than just a culinary footnote; it's a fundamental difference that dictates the optimal use of each bread. For the unparalleled joy of an authentic, mess-free, and incredibly flavorful gyro, the pocketless Greek pita reigns supreme. By understanding how to make Greek pita gyro bread at home, you unlock a world of delicious possibilities, ensuring your homemade gyros are not just good, but truly extraordinary. Embrace the softness, the chew, and the perfect embrace of this unique flatbread, and prepare to elevate your culinary game.
